Love Banner
Welcome to Valentine's Week here on mon petit lyons! I'm excited to share this first project for you. You may think it looks a little similar to the Birthday Banner from a few weeks ago. The instructions on that tutorial are a little more in depth, so feel free to reference that if anything is not detailed enough for you.

Supplies:
1 package double fold bias tape
1/4 yard felt, or 6 8x10 sheets
6 fabric scraps measuring 7.5" square in Valentine's colors
Embroidery thread & hand needle
coordinating machine thread
1. Step One: Cut the felt into 8" squares using pinking shears. Mark the lines on with your ruler before you start cutting. Cut the 6 fabric scraps to 7.5" square.
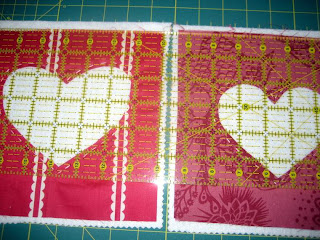
2. Step Two: Make a template for a large heart and the letters for the word "LOVE" by printing extra large letters in a font you like in microsoft word, or just freehand it.
3. Cut the letters & hearts out of the fabric squares - you'll be using the negative image, so keep that in mind as you cut.
4. Center each fabric square on a felt square. No need to pin, the felt will hold it in place. Use 3-4 strands from your embroidery thread and sew a straight stitch around each letter or heart in contrasting thread.

5. Now trim the tops of the pennants to make sure the felt & fabric are even.
6. Find the center of your bias tape and place it on your mat. Place the "V" 1 inch to the right of center and pin it tucked inside the bias tape. Repeat with the "O" 1 inch to the left of center. Continue out from the center pinning the banners inside the bias tape fold 2 inches apart until your banner reads "LOVE" with a heart at each end.

7. Start at the first heart and sew the bias tape closed, making sure to catch each flag, stopping at the end of the last heart.
8. Hang it up!


Supplies:
1 package double fold bias tape
1/4 yard felt, or 6 8x10 sheets
6 fabric scraps measuring 7.5" square in Valentine's colors
Embroidery thread & hand needle
coordinating machine thread
1. Step One: Cut the felt into 8" squares using pinking shears. Mark the lines on with your ruler before you start cutting. Cut the 6 fabric scraps to 7.5" square.
2. Step Two: Make a template for a large heart and the letters for the word "LOVE" by printing extra large letters in a font you like in microsoft word, or just freehand it.
3. Cut the letters & hearts out of the fabric squares - you'll be using the negative image, so keep that in mind as you cut.
4. Center each fabric square on a felt square. No need to pin, the felt will hold it in place. Use 3-4 strands from your embroidery thread and sew a straight stitch around each letter or heart in contrasting thread.

5. Now trim the tops of the pennants to make sure the felt & fabric are even.

6. Find the center of your bias tape and place it on your mat. Place the "V" 1 inch to the right of center and pin it tucked inside the bias tape. Repeat with the "O" 1 inch to the left of center. Continue out from the center pinning the banners inside the bias tape fold 2 inches apart until your banner reads "LOVE" with a heart at each end.

7. Start at the first heart and sew the bias tape closed, making sure to catch each flag, stopping at the end of the last heart.
8. Hang it up!


Comments
Post a Comment
I love to read your comments! I try to answer as many as I can, but if you need an answer and don't have an email address linked to your profile, I will reply here. Thanks!