The Long Weekender
I am so excited to be taking part in the Long Weekender Blog Hop! Thank you for joining me today!

I'll admit that Amy Butler's Weekender Pattern was never really on my radar until Jennifer talked me into a sewing playdate with another friend from our guild. That was an offer I couldn't refuse, so I got to work gathering my supplies.
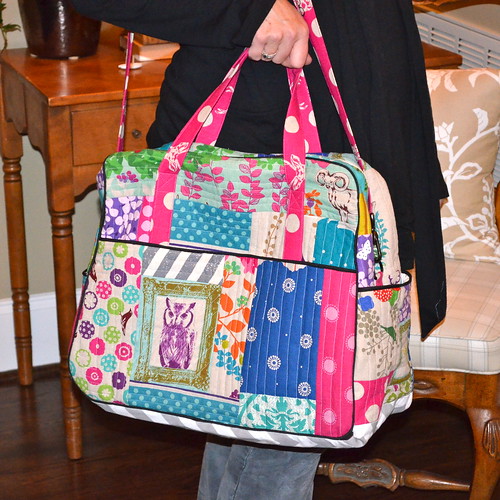
Let me just start by saying that this kind of seemed like a project better suited to a sewing perfectionist than me. I assumed this post would be comprised of a lot of mistakes I made and ways you could avoid them when you tackle your Weekender. I was mostly right, but even with all of its imperfections, I do love my Weekender! I will bold and italicize all of my "learn from my mistakes" for you to make it easier.
As soon as I saw Elizabeth Hartman's post about her quilt as you go Weekender, I knew that was what I was going to do. Especially since I had a fat quarter bundle of Echino that I had used hardly any of in the year or so it has been sitting on my shelf.

Before our Saturday sewing date I had to prepare all of my panels so that I would be ready to construct the bag during our session.


November 10: Courtney @ Mon Petit Lyons
November 11: Sarah @ Bluprint Textiles
November12: Leanne @ She Can Quilt
November 13: Lori @ Lori H. Designs
November 14: Heidi @ Fabric Mutt
November 15: Taryn @ Pixels to Patchwork
November 16 - 18: Project Link-up at Lori H. Designs
November 19: Prize Drawings Announced
I'll admit that Amy Butler's Weekender Pattern was never really on my radar until Jennifer talked me into a sewing playdate with another friend from our guild. That was an offer I couldn't refuse, so I got to work gathering my supplies.
Let me just start by saying that this kind of seemed like a project better suited to a sewing perfectionist than me. I assumed this post would be comprised of a lot of mistakes I made and ways you could avoid them when you tackle your Weekender. I was mostly right, but even with all of its imperfections, I do love my Weekender! I will bold and italicize all of my "learn from my mistakes" for you to make it easier.
As soon as I saw Elizabeth Hartman's post about her quilt as you go Weekender, I knew that was what I was going to do. Especially since I had a fat quarter bundle of Echino that I had used hardly any of in the year or so it has been sitting on my shelf.
Before our Saturday sewing date I had to prepare all of my panels so that I would be ready to construct the bag during our session.
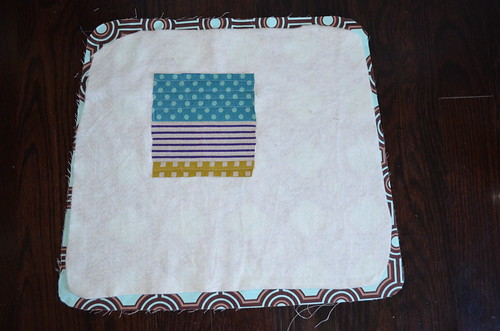
Instead of using a layer of canvas on my panels, like Elizabeth did, I decided to use some home dec fabric I had bought for a project that never materialized. Better to use up something I already had! So I cut the home dec fabric to the pattern size and the batting slightly smaller so that it wouldn't be in the 1/2" seam allowance. In retrospect I should have cut the entire panel larger, as it generally shrinks a little with the quilting, and then trimmed it down at the end.
If you have never done Quilt As You Go before it is pretty easy. I'm sure there are many ways to do it. I start by quilting on piece of fabric to my batting/backing and then adding other pieces around log cabin style. To add a piece you just put it right sides together, sew 1/4" seam, fold the piece back & quilt it down.
I managed to get all of the pieces quilted in time for our sewing playdate. The funny thing is that when we started we were all saying that we would never make another one again. It is a lot of prep work to gather supplies and get everything cut out. But, by the time we left we were all taking about our next Weekender!
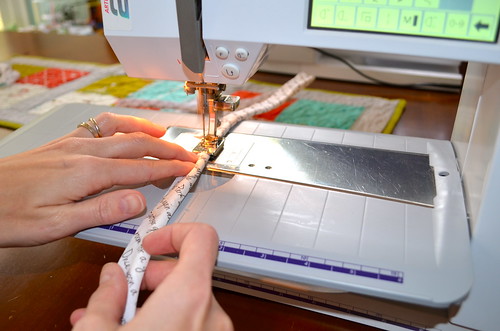
While we organized our supplies and talked about a game plan, Jennifer borrowed my piping foot to make piping with the bias strips she cut out. I bought pre-made piping at JoAnn's, but if you are making your own I would recommend trying to get a piping foot. You don't need to do anything other than feed your bias strips and cording into the presser foot.
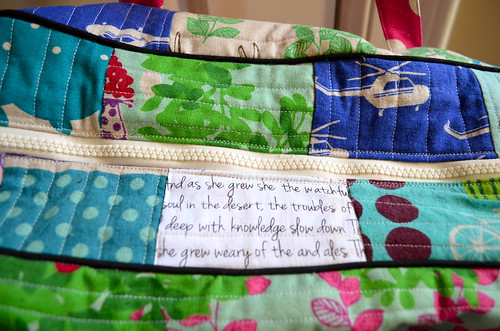
Here was my first mistake of the day: When I sewed the two central panels together I used a 1/2" seam allowance instead of the 1" in the directions. This made it impossible for me to install the zipper as directed. It was very difficult to rip out stitches with all of the layers and the quilting stitches, so I elected to install the zipper exposed like I normally do. Works fine, just not the look intended.
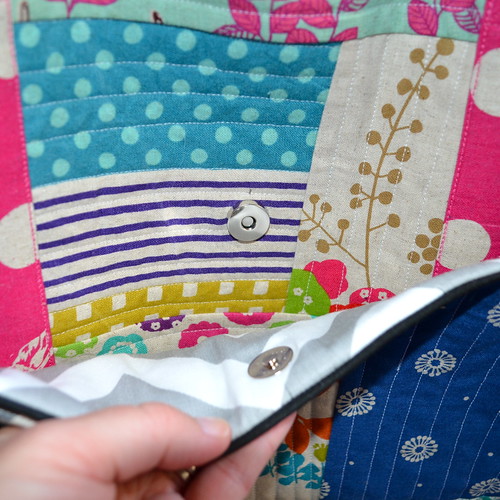
One change I made that I am happy with is to add magnetic snaps on the two front pockets. I have a tutorial for installing them here. Totally easy and totally worth it!
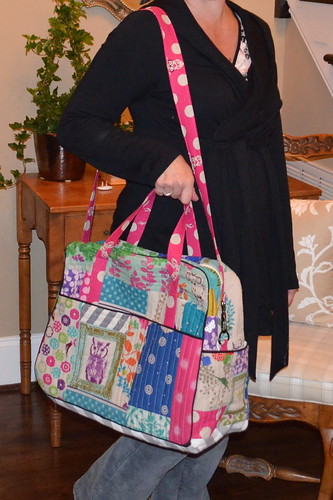
Another addition that I made and am happy about is the removable shoulder strap. I bought the hardware in the purse hardware aisle of JoAnn's. I made a long strap in the same fashion as the handles, but added the hook hardware to each end. A zipper foot is easy to sew close to this kind of hardware. Then I added a strap with a d-ring to each side of the zipper.
I sewed the lining in along the zipper with my machine (and zipper foot) and tacked it down in the corners by hand. I thought I took a picture of the inside, but I guess none of them turned out very well.
Can you spot my other huge mistake? I am really not sure how (other than rushing to just be finished!), but clearly my side pockets are not even! Not even close really!
So despite all the imperfections, I still am enjoying it! Plus I am kind of thinking of making another one. After all, I know exactly what to do this time!
Don't forget to link up your Weekender Bag on Lori's Blog next week. We'd love to see your Weekender and what's inside it. And if you haven't made one yet, don't let fear stop you. After all, it still looks pretty good even if you don't make it exactly perfect! Thanks for stopping by,
-Courtney


Absolutely brilliant!!!
ReplyDeleteBeautifully done! I love your materials you chose. I want to make one after reading about your experience!
ReplyDeleteSusie
legato1958@aol.com
Courtney, your bag is gorgeous! I love how it turned out! The long strap is amazing, and I wish I had added the snaps to the outer pockets. Enjoy the bag, it is beautiful!
ReplyDeletevery cute
ReplyDeleteMy end pockets aren't even either! Still trying to figure that one out . . .
ReplyDeleteYour bag is lovely. Love the changes. Love the learning curve. Great job, and great post!
You did a great job. Cheers!
ReplyDeleteAwesome bag just like it is! And great post about some of the finer details. Congrats - nicely done!
ReplyDeleteYour bag is wonderful. I really appreciate your tips, as I am finishing mine today. I love the colours and I think that different height pockets are a design feature, surely.
ReplyDeleteIt looks fabulous! My pockets aren't even either. :)
ReplyDeleteCourtney, this is gorgeous! I love hearing your honesty about the good stuff and the not so good stuff -- it really is so helpful. I'm hoping to get mine done this weekend, but one of my girls just came down with the flu today, so we'll see....
ReplyDeleteThis is beautiful- learning parts and all.
ReplyDeleteThanks for showing us the ups and downs of your bag. I really like the owl you put on the bag, how did you do that?
ReplyDeleteit came out so awesome! love your fabrics
ReplyDeleteHI! JUST SO NEAT!
ReplyDeleteBEAUTIFUL+USEFUL!
THANKS FOR SHARING!
msstitcher1948@yahoo.com
Great job on your bag - if you hadn't pointed out your mistakes, I never would have caught them
ReplyDeleteYou all have me hooked to make 2 bags..one for me one for my daughter. I did not need another project right now, but I can't resist. Maybe I'll get lucky and win some fabric to make them.
ReplyDeleteYour bag looks so great! I love the idea of a removable shoulder strap and magnetic snaps. I really like the look of this bag with the QAYG method. I made a similar mistake with using the wrong seam allowance but on the lining instead of the zipper part...I had to resew the whole lining again :D.
ReplyDeleteIt looks fantastic! Well done!
ReplyDeletePlugins tend to slow down blog sites so I avoided these unless I really need a plugin. Though I would have loved having those many buttons when editing.
ReplyDeletekizlik zari