{sewing tutorial} Turkey Tea Towel
This post originally appeared on Ellison Lane last year.
Hello, my name is Courtney and I blog at petit lyons. I'm so excited to be here on Ellison Lane today as part of the Holiday Hostess Series. I have three little boys and am lucky to stay home with them. I love to sew in my free time (which is much less now with the newest baby!). I am happy to finally share a tutorial for an item I've been making for years. This little linen and ribbon turkey made its first appearance when I had a booth at a BBQ festival several years ago on shirts. Since then I've sold lots of tees, napkins and dish towels on etsy and have made even more for my friends. I have taken a similar tea towel to my hostess at the last couple Thanksgiving dinners and they are always a hit.
Okay, let's get started with our supplies:
Dishtowel (you could also hem a rectangle of linen fabric)
Linen scrap 4x3" and similar size scrap of heat n' bond
Machine thread to coordinate with linen
Temporary marking pen, like pilot frixon
8-12 ribbon/ric rac scraps measuring about 5" in length in fall colors (yes, pink is a fall color for me!)
Orange and black or brown embroidery floss and hand sewing needle

Step One:
Iron your scrap of heat n' bond to the wrong side of your linen scrap. I usually whip up a few turkeys at a time, so my scrap is 4" in height but longer. I advise using a slightly smaller piece of heat n' bond than fabric, so that you don't gunk up your iron or ironing board.

Step Two:
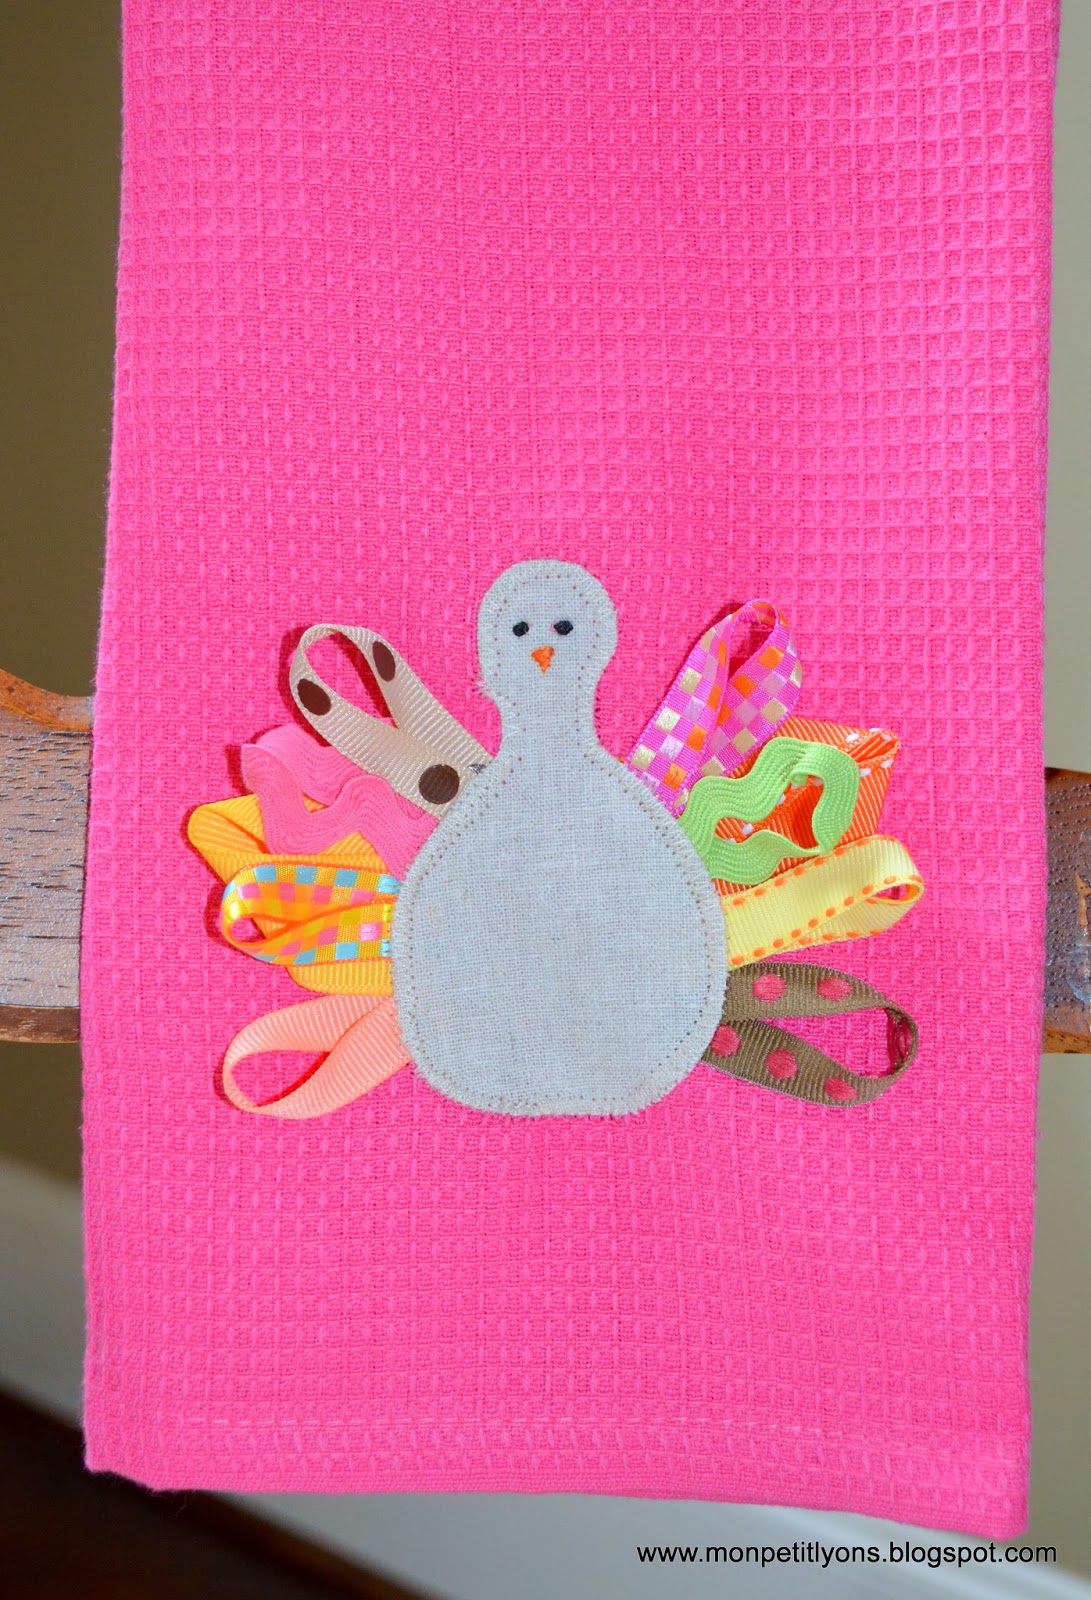
Once it is cool, peel the paper off of the back and turn your fabric to the right side. Now just draw a turkey shape with your temporary marking pen. I don't bother tracing or making a template because they each have their own personality when done this way and it keeps it interesting. Think of a figure eight or a bowling pin, but the bottom half should be much bigger. Cut out the turkey body.

Time to audition ribbons! Try to balance out colors and widths on each side.

Step Four:
Attach ribbons to turkey one at a time. You could use pins, but I find it much easier to just hold it and then quickly get it to the sewing machine under the presser foot to baste the ribbons on. Just go one at a time. Each ribbon should be looped with raw edges positioned under the turkey body. Easier to see than explain, I think!


Turn your turkey over and trim the excess ribbon close to the seam.

Repeat for the other side.

Step Five:
Your turkey is ready to get a face!

Get your trusty temporary marking tool out again and draw two dots for eyes and an upside down triangle beak.

I usually use black or brown thread to make two french knots for eyes. For the beak, I first outline the triangle shape and then satin stitch over it to fill in.

Step Six:
We are ready to attach the turkey to the tea towel! Place the turkey in the center of the towel near the bottom. Iron carefully, avoiding the ribbons - some of them are melty or have paint (those dots on the grosgrain) that can make quite a mess. We will be securing the turkey by sewing, so it is more important not to melt ribbons than to make sure he is completely attached. Think of it more as just holding him in place to sew.

We are ready for the final step. I use a narrow zig zag stitch and go slowly around the curves. If you have a needle down setting, you will want to take advantage of it. Make sure your outer zig zag edge is going into the dishtowel beyond the turkey body. Go all the way around and overlap just a half inch, then I like to change my stitch setting to a straight stitch go in reverse a little to lock in your seam.

I hope you had fun making this turkey. Remember, that he is pretty cute on tees and napkins and probably lots of other things too, so have fun!


That is a great way to do a turkey! Love it!
ReplyDelete(the top of your blog still says "two little boys")
So adorable. Thank you for all your support thru my crises.... Post a pix of your boys...I cant imagine how grown they are.
ReplyDeleteSo cute Courtney! This would make a cute thanksgiving hostess gift!
ReplyDeleteThis is so cute
ReplyDelete