{Applique Dish Towel} A Tutorial for Ellison Lane Handmade Holidays
This post first appeared as part of Ellison Lanes' Handmade Holidays:
For the Handmade Holidays series I thought it would be fun to make an applique dishtowel. This makes a great hostess or neighbor gift, and since it is more winter-y than Christmas-y your recipient can leave it out long after the holiday decorations have been put away.

You will need:
Backing Fabric - 16 x 24"
Snow fabric - 5 x 16"
Sky fabric* - 19.5 x 16"
Fabric scraps for tree and snowman
twill tape or ribbon
glue stick
embroidery thread in black, brown, white and orange
*Preferably this should be linen. Linen is really absorbent for a dish towel and just gets better and better the more you use and wash it. Just, please prewash it at least once before construction. It shrinks a lot more than quilting cottons.

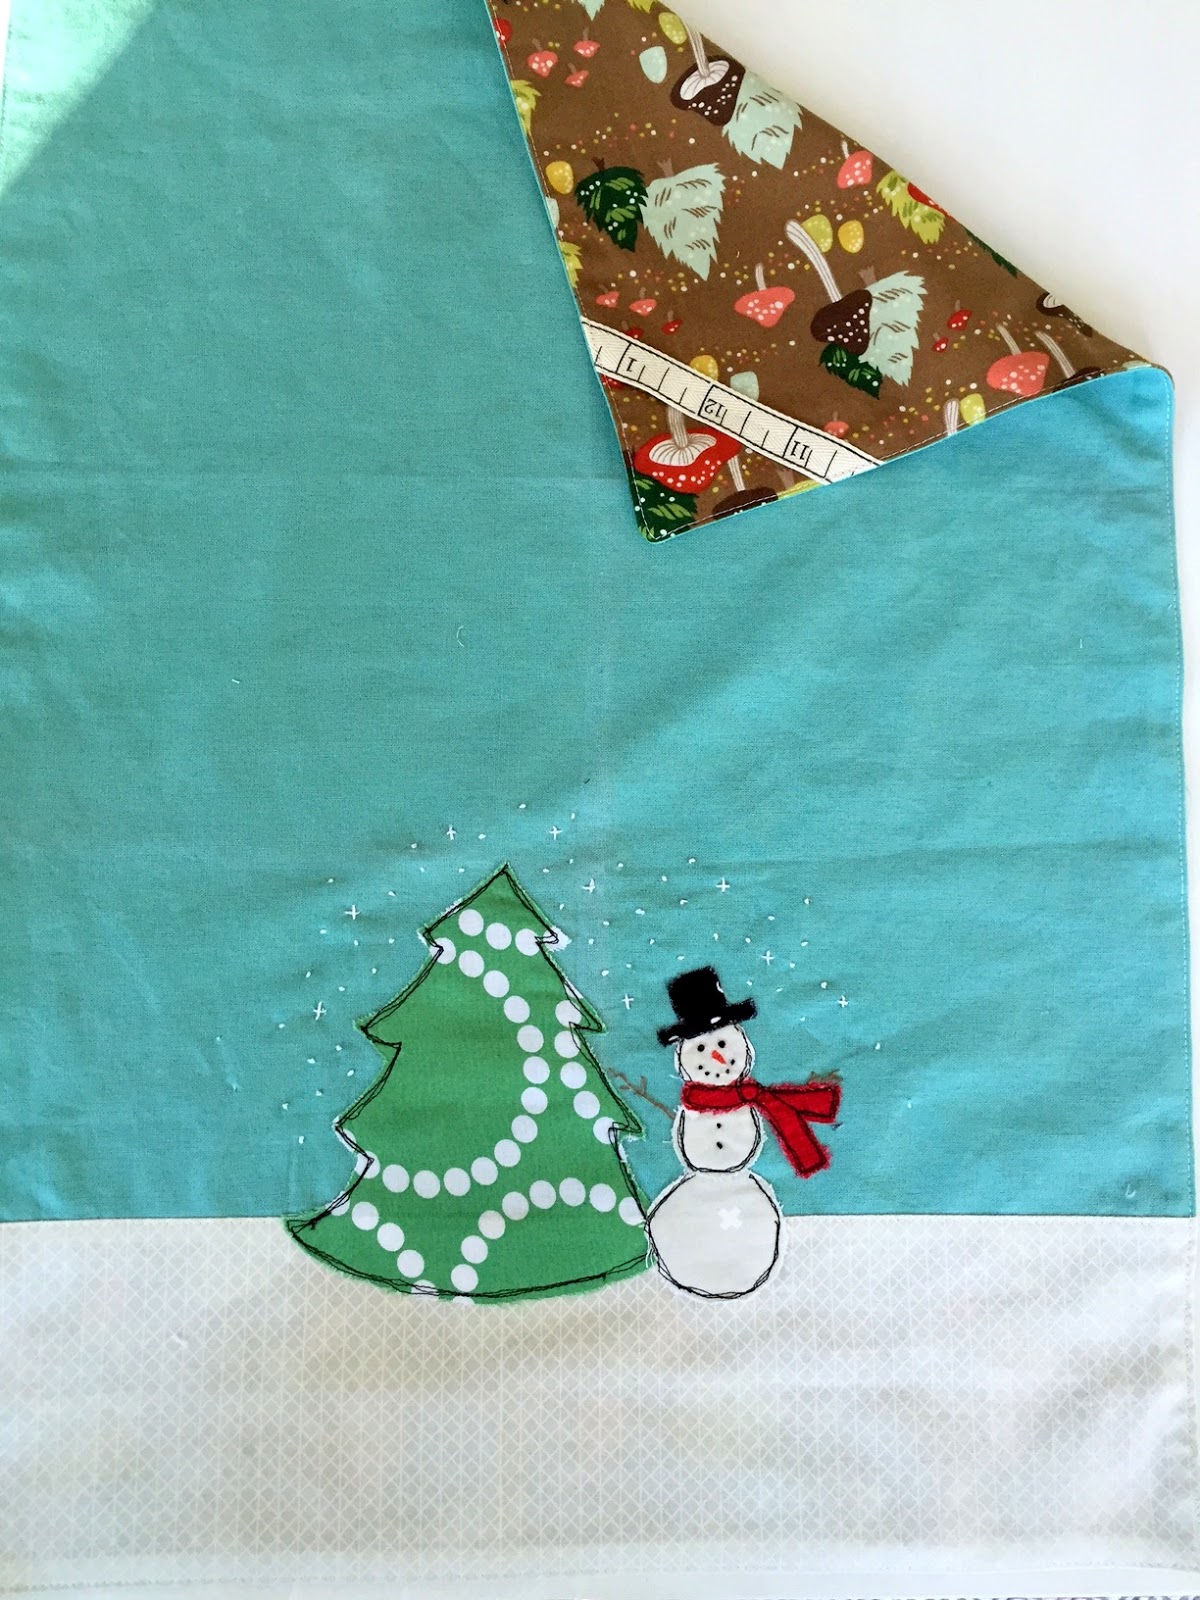
1. Sew the white strip of snow fabric to the sky fabric along the 16" edge. Press and topstich. This becomes the front of your dishtowel.
2. Cut a tree shape, three white circles, a black hat and red scarf from your scraps. Choose a layout you like and secure them to the front of your dishtowel with a washable glue stick. Press with a hot iron to secure. I always used to use heat'n bond for applique, but the sticky residue would gum up the needle and cause skipped stitches, so I've found the glue stick much easier to work with!

3. Using black thread stitch around your applique shapes. I like to go around the shapes three times to get a sketchy look. I used a small needle (70) and a small stitch length (2.5) with a regular foot, but you can play around with zig zag, invisible thread or free motion quilting.

4. Mark eyes, carrot nose, mouth, buttons and stick arms for your snowman with a removable ink pen. Embroider any way you like. I did it by hand with embroidery thread, but some people are able to do it by machine.

5. Cut a length of twill tape (about 4-5") or ribbon to use for hanging and baste or pin it to the back of your dishtowel on one upper corner.

6. Prepare to sew your dishtowel together by placing front and back right sides together and pin. Make a two marks 4" apart along one side to stop and start your seam. I always sew out to the edge and turn to get a clean finish when I'm ready to turn it right side out. Sew the two sides together with a generous 1/4" or even a little bigger seam allowance (just to be safe with the linen).
7. Turn right side out and use a chopstick or turning tool to get the corners pushed out nicely. Press and top-stitch all the way around. A top-stitching foot makes it really easy to get a nice, even stitch, as does using a longer stitch length (I used 3.25).
Ta-da!

For the Handmade Holidays series I thought it would be fun to make an applique dishtowel. This makes a great hostess or neighbor gift, and since it is more winter-y than Christmas-y your recipient can leave it out long after the holiday decorations have been put away.

You will need:
Backing Fabric - 16 x 24"
Snow fabric - 5 x 16"
Sky fabric* - 19.5 x 16"
Fabric scraps for tree and snowman
twill tape or ribbon
glue stick
embroidery thread in black, brown, white and orange
*Preferably this should be linen. Linen is really absorbent for a dish towel and just gets better and better the more you use and wash it. Just, please prewash it at least once before construction. It shrinks a lot more than quilting cottons.

1. Sew the white strip of snow fabric to the sky fabric along the 16" edge. Press and topstich. This becomes the front of your dishtowel.
2. Cut a tree shape, three white circles, a black hat and red scarf from your scraps. Choose a layout you like and secure them to the front of your dishtowel with a washable glue stick. Press with a hot iron to secure. I always used to use heat'n bond for applique, but the sticky residue would gum up the needle and cause skipped stitches, so I've found the glue stick much easier to work with!

3. Using black thread stitch around your applique shapes. I like to go around the shapes three times to get a sketchy look. I used a small needle (70) and a small stitch length (2.5) with a regular foot, but you can play around with zig zag, invisible thread or free motion quilting.

4. Mark eyes, carrot nose, mouth, buttons and stick arms for your snowman with a removable ink pen. Embroider any way you like. I did it by hand with embroidery thread, but some people are able to do it by machine.

5. Cut a length of twill tape (about 4-5") or ribbon to use for hanging and baste or pin it to the back of your dishtowel on one upper corner.

6. Prepare to sew your dishtowel together by placing front and back right sides together and pin. Make a two marks 4" apart along one side to stop and start your seam. I always sew out to the edge and turn to get a clean finish when I'm ready to turn it right side out. Sew the two sides together with a generous 1/4" or even a little bigger seam allowance (just to be safe with the linen).
7. Turn right side out and use a chopstick or turning tool to get the corners pushed out nicely. Press and top-stitch all the way around. A top-stitching foot makes it really easy to get a nice, even stitch, as does using a longer stitch length (I used 3.25).
Ta-da!


Comments
Post a Comment
I love to read your comments! I try to answer as many as I can, but if you need an answer and don't have an email address linked to your profile, I will reply here. Thanks!