Happy Birthday Banner!
Hope you are all enjoying your Saturday. I went for a run & finished up my little sewing project while Andrew took the little ones to the Tile Collection (little kitchen project coming up, more details later) and Toys R Us!
So, next weekend we are hosting a birthday party for the boys at our home. They are turning 2 and 4 and are obsessed with firemen. I've chosen to pair aqua with the red fire trucks and wanted to make a little pennant banner that we could use every year for their parties. I did not want to sew each flag because I have a bunch of other things to do before the party & I thought it might not ever get finished if it went that route! I decided felt might be a good, no-sew option.

Materials Needed:
1/2 yard of felt (you'll have extra leftover for the upcoming LOVE banner!)
2 packages of double fold bias tape
13 charm squares or scraps of fabric
coordinating thread
pinking shears or pinking rotary cutter
ruler
1. Make the Pennants
I decided to make my pennants 10" tall by 7" wide. Using a ruler, draw a line across the length of the fabric 10" from the bottom. I have done this on my self healing mat, which makes it easier to get everything straight. Next measure 1/2 th width (3.5") and make a dot along the bottom at that point. Continue making dots every 7" and make dots every 7" along your line. Now, use your ruler to connect the dots to make the triangle shapes. Do this until you have 13 full triangles (the half one on the right doesn't count).

2. Cut out the Pennants
Cut them out with your pinking shears or rotary cutter.

3. Prepare your Fabric
Gather thirteen of your fabric scraps and cut them into 3" x 4" rectangles. You can put them in piles and use your rotary cutter and mat to make this step go quicker.
 4. Trace & Cut Out your Letters
First line up your 13 scraps in a pleasing pattern (I alternated aqua & red fabrics). Use a template by printing out the letters HAPY BIRTHD (no need to cut doubles of the letters used more than once) in microsoft Word with the font enlarged enough to fill the 4" tall blocks. Or just free-hand it like I did and get a much quicker, albeit messier, outcome. Cut them out.
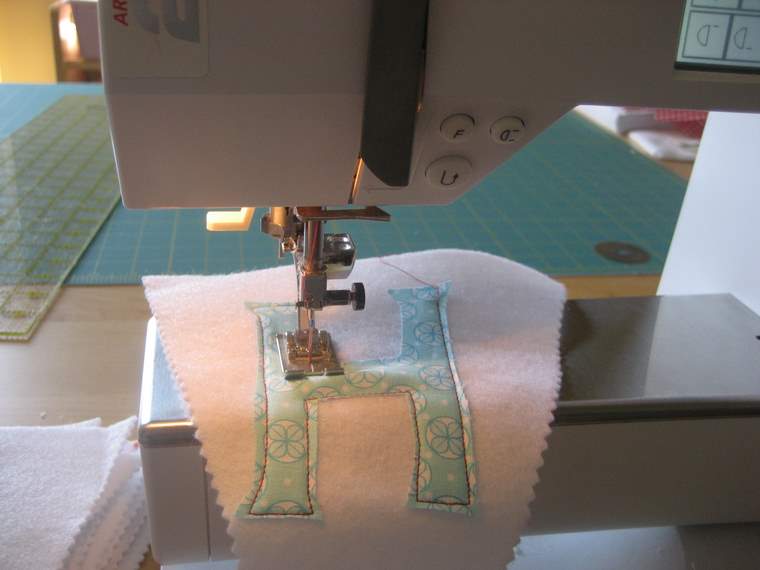
 5. Put on the Letters
Position letters on the felt. Pay attention to how far they are from the top of the flag & make this measurement uniform on all the penants. No need to pin, the felt will hold your letters in place. Stitch around each letter about 1/4" in from the edge.
 6. Position Pennants on Bias Tape.
Open your two packs of bias tape (should be 4 yards each). Find the middle by folding each length in half & mark it with a pin. One length of tape should hold the HAPPY pennants and the other will be for the BIRTHDAY pennants. Start with HAPPY and put the "P" in the center & pin between the fold of the bias tape. Work out from the center to pin the other flags 3" apart. Do the same with BIRTHDAY, except since there are an even number of letters your center will be between the T and H. Each flag will go 1.5" from the center mark on your bias tape.

7. Sew Pennants to Bias Tape
Starting with the first flag sew the bias tape closed until you get to the last flag on the bias tape. I sewed along the center of the bias tape. Make sure you have the flag securely tucked into the fold as you move along.
OOPS, forgot the picture!
8. Hang up your Banner!
This is trickier than it seems. But at least you know your centers for each so play around and you'll get it after a few tries.
 9. Eat Some Chocolate!
You deserve it, this is a crucial step, don't skip it!
Let me know if you end up trying one! Post a comment with a link to your photo. I'll be doing a modified version for Valentine's Day a little later. Plus a bunch of house projects coming up. Transforming a boring mismatched coffee table with a swedish gray finish, some tile work in the kitchen & more birthday party & valentine's decorating!
Have a great weekend,
Courtney
So, next weekend we are hosting a birthday party for the boys at our home. They are turning 2 and 4 and are obsessed with firemen. I've chosen to pair aqua with the red fire trucks and wanted to make a little pennant banner that we could use every year for their parties. I did not want to sew each flag because I have a bunch of other things to do before the party & I thought it might not ever get finished if it went that route! I decided felt might be a good, no-sew option.

Materials Needed:
1/2 yard of felt (you'll have extra leftover for the upcoming LOVE banner!)
2 packages of double fold bias tape
13 charm squares or scraps of fabric
coordinating thread
pinking shears or pinking rotary cutter
ruler
1. Make the Pennants
I decided to make my pennants 10" tall by 7" wide. Using a ruler, draw a line across the length of the fabric 10" from the bottom. I have done this on my self healing mat, which makes it easier to get everything straight. Next measure 1/2 th width (3.5") and make a dot along the bottom at that point. Continue making dots every 7" and make dots every 7" along your line. Now, use your ruler to connect the dots to make the triangle shapes. Do this until you have 13 full triangles (the half one on the right doesn't count).

2. Cut out the Pennants
Cut them out with your pinking shears or rotary cutter.

3. Prepare your Fabric
Gather thirteen of your fabric scraps and cut them into 3" x 4" rectangles. You can put them in piles and use your rotary cutter and mat to make this step go quicker.

First line up your 13 scraps in a pleasing pattern (I alternated aqua & red fabrics). Use a template by printing out the letters HAPY BIRTHD (no need to cut doubles of the letters used more than once) in microsoft Word with the font enlarged enough to fill the 4" tall blocks. Or just free-hand it like I did and get a much quicker, albeit messier, outcome. Cut them out.

Position letters on the felt. Pay attention to how far they are from the top of the flag & make this measurement uniform on all the penants. No need to pin, the felt will hold your letters in place. Stitch around each letter about 1/4" in from the edge.
Open your two packs of bias tape (should be 4 yards each). Find the middle by folding each length in half & mark it with a pin. One length of tape should hold the HAPPY pennants and the other will be for the BIRTHDAY pennants. Start with HAPPY and put the "P" in the center & pin between the fold of the bias tape. Work out from the center to pin the other flags 3" apart. Do the same with BIRTHDAY, except since there are an even number of letters your center will be between the T and H. Each flag will go 1.5" from the center mark on your bias tape.

7. Sew Pennants to Bias Tape
Starting with the first flag sew the bias tape closed until you get to the last flag on the bias tape. I sewed along the center of the bias tape. Make sure you have the flag securely tucked into the fold as you move along.
OOPS, forgot the picture!
8. Hang up your Banner!
This is trickier than it seems. But at least you know your centers for each so play around and you'll get it after a few tries.

You deserve it, this is a crucial step, don't skip it!
Let me know if you end up trying one! Post a comment with a link to your photo. I'll be doing a modified version for Valentine's Day a little later. Plus a bunch of house projects coming up. Transforming a boring mismatched coffee table with a swedish gray finish, some tile work in the kitchen & more birthday party & valentine's decorating!
Have a great weekend,
Courtney


Comments
Post a Comment
I love to read your comments! I try to answer as many as I can, but if you need an answer and don't have an email address linked to your profile, I will reply here. Thanks!