Zippered Pouch Tutorial
Goodness, this tutorial was a lot of pictures and steps. If you are going to attempt it, it's easy, but takes a while, then you better go get some chocolate to fortify yourself! Seriously. I'm going to do this in two posts because it is just a lot of photos, so come back for tomorrow for part 2. And come back next week for:

So, this tutorial is to make a nice, lined zippered pouch with an elasticized pocket inside. I made mine to fit my son's new Leapster and games. If you are making it for a Leapster, I suggest cutting the length & width of the main fabric 1 inch - it is just a bit too roomy. If you're making it for makeup or whatever, it's a nice size as is. If you've never installed a zipper before this is a great place to start - I have lots of photos and instructions to help you along.
Zippered Pouch Tutorial Part 1

Supplies:
Zipper
Fabric for outside, lining & pocket (less than 1/4 yard of each)
heavy interfacing or fusible fleece
1/8" narrow elastic
small safety pin
coordinating thread
zipper foot
Step 1: Cut a 9 inch strip the width of your main fabric. From that, cut 3 rectangles 13 inches wide to make the front & back of the outside of your pouch & the pocket. Fold the fabric for the pocket in half with wrong sides facing to make a 13" x 4.5" rectangle & press. My exterior fabric is a japanese linen blend with cars and fire trucks.

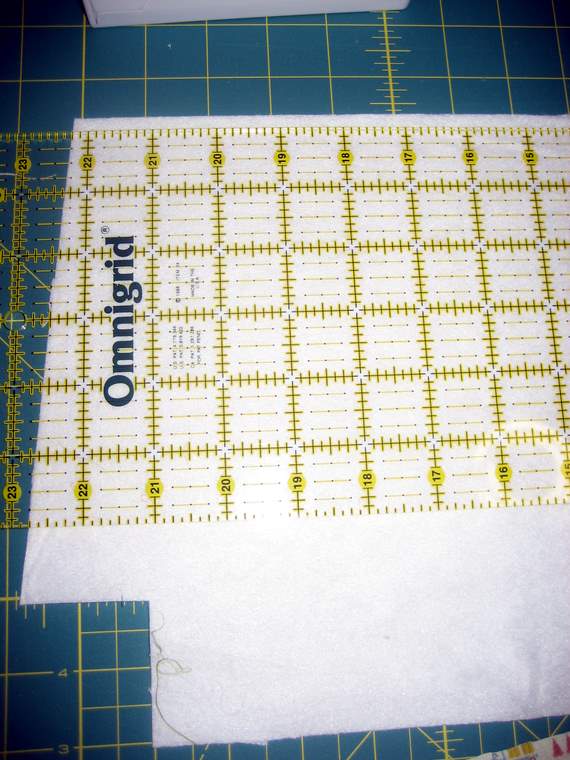
Step 2: Turn your outside front & back into a trapezoid. Make the top inch one inch shorter on each side than the bottom by placing a ruler from the bottom corner to one inch smaller on the top.

Step 3: Cut out the corners. Cut a two inch square out of each bottom corner on both pieces. Keep the right angle along the bottom. SAVE THE SQUARES!

Step 4. Make the same shape 2 more times with your lining fabric and 2 more times with your interfacing/fusible fleece. My lining fabirc is the blue Truck Stop Dots from Alexander Henry.

Step 5: Trim 1/4" off the top of your fusible fleece.

Step 6: Make your pocket. Create a channel for your elastic to go through by sewing 3/8" in along the folded edge of your pocket piece.
 Step 7: Using a small safety pin, thread the elastic through the channel and leave a bit out at each end so you don't lose them in there.

Step 8: Sew the pocket onto one side of the lining fabric by placing the lining piece right side up and placing the raw edge of the pocket (with the rest of the pocket facing down towards the bottom) across the tops of the squares you cut off, pin and sew 1/4" seam.

Step 9: Press the pocket up. Nice!

Step 10: Adjust the elastic to your liking and baste the sides of the pocket to the sides of the lining piece with a 1/4" seam and trim the edges. It should be tight enough that the sides of the panel pull together a little, but not so tight that you can't stretch the lining piece back.
Step 11: Now that all your pieces are ready to go, let's work on the zipper. Take 2 of your squares you cute from the outside fabric and fold them in half and press.
Step 12: Line up your zipper next to your front piece and place the folded squares across the zipper, folded edge toward the center, so that it lines up with the exterior piece. Pin.

Step 13: Baste the squares in place, sewing a 1/4" seam along the raw edge & across the zipper (yes, you can sew over it, just go slow).

Okay, that's enough for today! Tomorrow we will start with the zipper and you'll be amazed how fast it will come together. The hard part is over!

So, this tutorial is to make a nice, lined zippered pouch with an elasticized pocket inside. I made mine to fit my son's new Leapster and games. If you are making it for a Leapster, I suggest cutting the length & width of the main fabric 1 inch - it is just a bit too roomy. If you're making it for makeup or whatever, it's a nice size as is. If you've never installed a zipper before this is a great place to start - I have lots of photos and instructions to help you along.
Zippered Pouch Tutorial Part 1

Supplies:
Zipper
Fabric for outside, lining & pocket (less than 1/4 yard of each)
heavy interfacing or fusible fleece
1/8" narrow elastic
small safety pin
coordinating thread
zipper foot
Step 1: Cut a 9 inch strip the width of your main fabric. From that, cut 3 rectangles 13 inches wide to make the front & back of the outside of your pouch & the pocket. Fold the fabric for the pocket in half with wrong sides facing to make a 13" x 4.5" rectangle & press. My exterior fabric is a japanese linen blend with cars and fire trucks.

Step 2: Turn your outside front & back into a trapezoid. Make the top inch one inch shorter on each side than the bottom by placing a ruler from the bottom corner to one inch smaller on the top.

Step 3: Cut out the corners. Cut a two inch square out of each bottom corner on both pieces. Keep the right angle along the bottom. SAVE THE SQUARES!

Step 4. Make the same shape 2 more times with your lining fabric and 2 more times with your interfacing/fusible fleece. My lining fabirc is the blue Truck Stop Dots from Alexander Henry.

Step 5: Trim 1/4" off the top of your fusible fleece.
Step 6: Make your pocket. Create a channel for your elastic to go through by sewing 3/8" in along the folded edge of your pocket piece.


Step 8: Sew the pocket onto one side of the lining fabric by placing the lining piece right side up and placing the raw edge of the pocket (with the rest of the pocket facing down towards the bottom) across the tops of the squares you cut off, pin and sew 1/4" seam.

Step 9: Press the pocket up. Nice!

Step 10: Adjust the elastic to your liking and baste the sides of the pocket to the sides of the lining piece with a 1/4" seam and trim the edges. It should be tight enough that the sides of the panel pull together a little, but not so tight that you can't stretch the lining piece back.
Step 11: Now that all your pieces are ready to go, let's work on the zipper. Take 2 of your squares you cute from the outside fabric and fold them in half and press.
Step 12: Line up your zipper next to your front piece and place the folded squares across the zipper, folded edge toward the center, so that it lines up with the exterior piece. Pin.

Step 13: Baste the squares in place, sewing a 1/4" seam along the raw edge & across the zipper (yes, you can sew over it, just go slow).

Okay, that's enough for today! Tomorrow we will start with the zipper and you'll be amazed how fast it will come together. The hard part is over!


Comments
Post a Comment
I love to read your comments! I try to answer as many as I can, but if you need an answer and don't have an email address linked to your profile, I will reply here. Thanks!