Tote Bag 101
I love to make tote bags and I've made a bunch from various tutorials and patterns. I wanted to put a tutorial together showing my go-to way to make a tote (all basic sewing techniques, nothing unique, but just my favorite combo of them). Next week on the blog I'll show you how to add some frills to make it even more utilitarian (like a zippered interior pocket and a magnetic closure).
I tried to take 1/2 yards of fabric and make a tote as large as you can. I just use these to shop with, so I like it to be collapsible. If you want yours sturdier, you can add interfacing or fusible fleece to the main panel pieces. I'll also go over some other ideas to make it hold it's shape better in the post next week.

Supplies:
1/2 yard main fabric 44" wide
1/2 yard lining fabric 54" wide (if using 44" wide fabric, you will need one more 4" x WOF strip in a complementary or contrasting fabric)
coordinating thread
Directions:
1. Cut two rectangles from main & lining fabric measuring 20" across by 18" tall (or as close to 18 as you can get with your cut). Tip - fold your half yard with right sides together from selvage to selvage and cut both together (they'll be ready to sew!).
2. Cut a 4" square from the bottom of each corner from each of the 4 pieces (2 of main & 2 of lining).

3. Prepare the straps. Cut two strips 4" by 18". Put the strap right side down on the ironing board and fold in 1/2" on each short side, press.

4. Now fold the strap piece in half lengthwise with wrong sides together. Unfold and fold each half in towards the center press line.

Then fold it in half again so no raw edges are exposed. Sorry for the awkward explanation but it looks like this:

5. Top stitch all the way around 1/8" from edge. Repeat steps 3-5 for the other strap. Now the toughest part is finished!

6. Sew the body of the bag. Place your main fabric right sides together (if you followed my cutting tip, they are already set!), and sew a 1/2" seam down both sides and along the bottom. I used a serger because it's fast, but you are fine with a regular sewing machine. Ignore the corner cutouts for now.
Repeat for the lining panels.

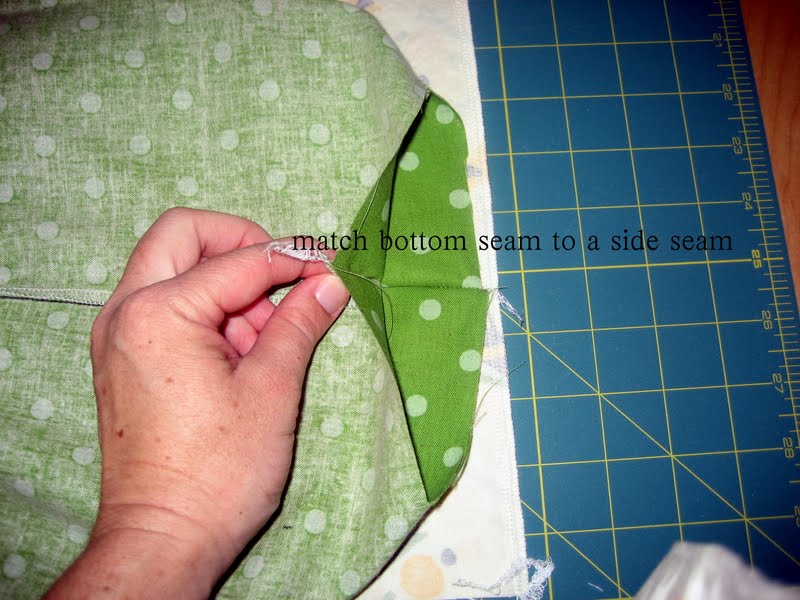
7. Now open up one corner and match one side seam to the bottom seam and sew along the line 1/2". Repeat on other 3 corners of main & lining bag body.


8. Your bag body is constructed. Turn your main fabric bag body right side out, but leave the lining one inside out. Fold each over 1/2" wrong sides together and press.

9. Now fit the lining inside the main bag body and pin around the top.

10. Find the center of each side and place a pin there. Place the bag, flattened, on a cutting mat, or use a ruler, and position one strap so that the ends are 3" from the center point, or 6" apart. Pin them in place with 1" below the top line of the bag. Repeat on the opposite side.

11. Now top stitch all the way around the top of the bag 1/8" from the edge, making sure to reverse when you start and finish to secure the seam. When you get to any of the 4 ends of the straps quilt a box following the seam line already on the strap and then making an x through it like so (then continue on along the top edge):

12. All finished! And it's reversible!

I tried to take 1/2 yards of fabric and make a tote as large as you can. I just use these to shop with, so I like it to be collapsible. If you want yours sturdier, you can add interfacing or fusible fleece to the main panel pieces. I'll also go over some other ideas to make it hold it's shape better in the post next week.

Supplies:
1/2 yard main fabric 44" wide
1/2 yard lining fabric 54" wide (if using 44" wide fabric, you will need one more 4" x WOF strip in a complementary or contrasting fabric)
coordinating thread
Directions:
1. Cut two rectangles from main & lining fabric measuring 20" across by 18" tall (or as close to 18 as you can get with your cut). Tip - fold your half yard with right sides together from selvage to selvage and cut both together (they'll be ready to sew!).
2. Cut a 4" square from the bottom of each corner from each of the 4 pieces (2 of main & 2 of lining).

3. Prepare the straps. Cut two strips 4" by 18". Put the strap right side down on the ironing board and fold in 1/2" on each short side, press.

4. Now fold the strap piece in half lengthwise with wrong sides together. Unfold and fold each half in towards the center press line.

Then fold it in half again so no raw edges are exposed. Sorry for the awkward explanation but it looks like this:

5. Top stitch all the way around 1/8" from edge. Repeat steps 3-5 for the other strap. Now the toughest part is finished!

6. Sew the body of the bag. Place your main fabric right sides together (if you followed my cutting tip, they are already set!), and sew a 1/2" seam down both sides and along the bottom. I used a serger because it's fast, but you are fine with a regular sewing machine. Ignore the corner cutouts for now.
Repeat for the lining panels.

7. Now open up one corner and match one side seam to the bottom seam and sew along the line 1/2". Repeat on other 3 corners of main & lining bag body.

8. Your bag body is constructed. Turn your main fabric bag body right side out, but leave the lining one inside out. Fold each over 1/2" wrong sides together and press.

9. Now fit the lining inside the main bag body and pin around the top.

10. Find the center of each side and place a pin there. Place the bag, flattened, on a cutting mat, or use a ruler, and position one strap so that the ends are 3" from the center point, or 6" apart. Pin them in place with 1" below the top line of the bag. Repeat on the opposite side.

11. Now top stitch all the way around the top of the bag 1/8" from the edge, making sure to reverse when you start and finish to secure the seam. When you get to any of the 4 ends of the straps quilt a box following the seam line already on the strap and then making an x through it like so (then continue on along the top edge):

12. All finished! And it's reversible!


So cute and I actually think I can do this! Thanks Courtney! I can't wait to try it!
ReplyDeleteI'm ready to give this a try. My niece would like bags for her bridesmaids. If this goes well, we will have them monogrammed too :) Wish me luck! And, thank you for your wonderful tutorials. Those of us who are not as experienced as you sincerely appreciate you!!!
ReplyDelete