Winterkist Blog Hop - Table Runner
When Katie contacted me about taking part in a blog hop with Monica Solorio-Snow's yet to be released line, Winterkist, I couldn't have been more excited. Or so I thought until I opened the little bundle that arrived in my mailbox! The colors Katie chose were just perfect for me. At some point before they arrived I decided to make a table runner, and now with the turquoise/aqua colorway it would look festive and match my house!
Monica's Winterkist line for Lecien is not my first experience with these adorable little Gnomas, I fell hard for them in her Holiday Happy line too.
I fully intended to write a step by step tutorial for a table runner, but then my camera broke. I think I have pictures of the most crucial steps in case you want to make something similar.

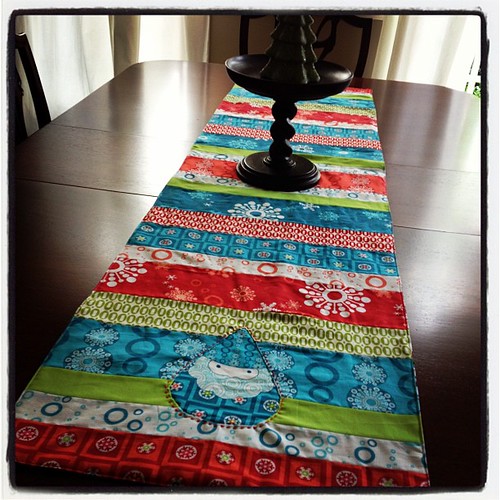
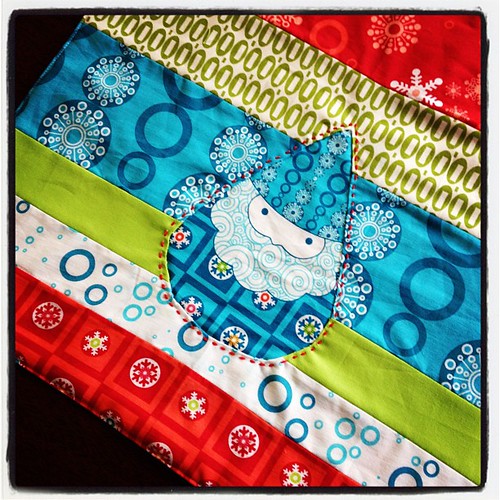
Your first step is to make a strip pieced runner. I cut strips 16" wide and anywhere from 2-5" tall. Piece them together with 1/4" seams and press them open. My runner is symmetrical, but your strips can be put in any order you like.

Once your runner is the size you like, take a gnoma for each side and think about where he will look best. Place a piece of freezer paper over the gnoma, shiny side down and trace the outline with a permanent marker. Cut the gnoma out, taking care to keep the reverse shape intact. Iron the negative shape to the underside of the runner where you want the gnoma to peek through. Luckily I did a tutorial on reverse applique here so you can see what to do!
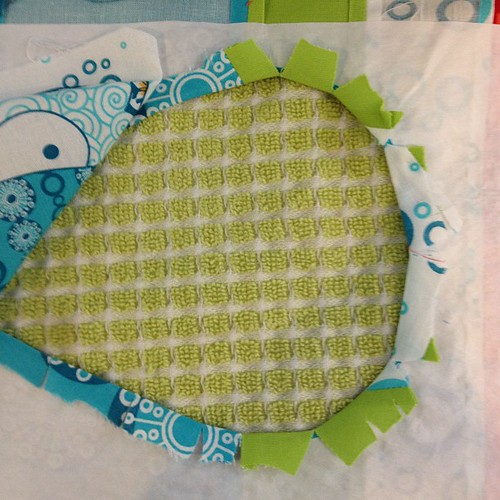
I attached the gnoma by leaving the freezer paper intact, pinning the gnoma in place and sewing an invisible stitch to secure the gnoma and then removing the freezer paper.
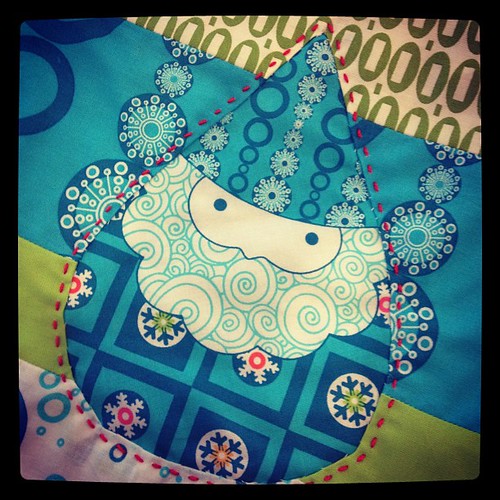
My next step was to baste the table runner front to the batting, but not the backing yet. Then I used embroidery floss to stitch around each gnoma as well as a few lines 1/4" from the seams on the runner.
I wanted my runner to be reversible, so I did not want the decorative embroidery stitches to go all the way through. I also couldn't decide on a binding fabric, so I just decided to sew it without one. I placed the front with batting basted (and embroidered) right sides together with the backing, sewed all around the edge, flipped and topstitched 1/8" from the edge.
I know this is not as thorough as my usual tutorials, so please don't hesitate to contact me if you need more instruction!
The schedule for the hop is below. Each Friday Katie will draw a comment from one of the five posts that week (so five chances to win each week!) to win a fat quarter bundle from the Fat Quarter Shop!

Aug 6 Katie at There & Back
Aug 7 Rachael at imagine gnats
Aug 8 Jennie at Clover & Violet
Aug 9 Courtney at mon petit lyons
Aug 10 Sara at Sew Sweetness
Aug 13 Bianca at Sweet Diesel Designs
Aug 14 Chelsea at Pins & Bobbins
Aug 15 Rebecca at Sew Festive Handmade
Aug 16 Diane at from blank pages
Aug 17 Allegory at {sew} Allegorical
Aug 20 Kim at My Go-Go Life
Aug 21 Di at Random Thoughts...do or "di"
Aug 22 Jennifer at Ellison Lane Quilts
Aug 23 Jenelle at Echinops & Aster
Aug 24 Katie at There & Back
I've been seeing sneak peaks pop up on flickr and the projects these bloggers are putting together are amazing! I can't wait to see them all!
Monica's Winterkist line for Lecien is not my first experience with these adorable little Gnomas, I fell hard for them in her Holiday Happy line too.
I fully intended to write a step by step tutorial for a table runner, but then my camera broke. I think I have pictures of the most crucial steps in case you want to make something similar.

Your first step is to make a strip pieced runner. I cut strips 16" wide and anywhere from 2-5" tall. Piece them together with 1/4" seams and press them open. My runner is symmetrical, but your strips can be put in any order you like.

Once your runner is the size you like, take a gnoma for each side and think about where he will look best. Place a piece of freezer paper over the gnoma, shiny side down and trace the outline with a permanent marker. Cut the gnoma out, taking care to keep the reverse shape intact. Iron the negative shape to the underside of the runner where you want the gnoma to peek through. Luckily I did a tutorial on reverse applique here so you can see what to do!
I attached the gnoma by leaving the freezer paper intact, pinning the gnoma in place and sewing an invisible stitch to secure the gnoma and then removing the freezer paper.
My next step was to baste the table runner front to the batting, but not the backing yet. Then I used embroidery floss to stitch around each gnoma as well as a few lines 1/4" from the seams on the runner.
I wanted my runner to be reversible, so I did not want the decorative embroidery stitches to go all the way through. I also couldn't decide on a binding fabric, so I just decided to sew it without one. I placed the front with batting basted (and embroidered) right sides together with the backing, sewed all around the edge, flipped and topstitched 1/8" from the edge.
I know this is not as thorough as my usual tutorials, so please don't hesitate to contact me if you need more instruction!
On to the Winterkist Blog Hop details!
The schedule for the hop is below. Each Friday Katie will draw a comment from one of the five posts that week (so five chances to win each week!) to win a fat quarter bundle from the Fat Quarter Shop!
Aug 6 Katie at There & Back
Aug 7 Rachael at imagine gnats
Aug 8 Jennie at Clover & Violet
Aug 9 Courtney at mon petit lyons
Aug 10 Sara at Sew Sweetness
Aug 13 Bianca at Sweet Diesel Designs
Aug 14 Chelsea at Pins & Bobbins
Aug 15 Rebecca at Sew Festive Handmade
Aug 16 Diane at from blank pages
Aug 17 Allegory at {sew} Allegorical
Aug 20 Kim at My Go-Go Life
Aug 21 Di at Random Thoughts...do or "di"
Aug 22 Jennifer at Ellison Lane Quilts
Aug 23 Jenelle at Echinops & Aster
Aug 24 Katie at There & Back
I've been seeing sneak peaks pop up on flickr and the projects these bloggers are putting together are amazing! I can't wait to see them all!


This is so cute!!! Love those little guys!
ReplyDeleteI love your runner! I want to make one! Thank you for sharing. Darn I hope I wins some fabric ;) Janelle from Emmaline Bags.
ReplyDeleteHe is SO cute and I love those colors!!
ReplyDeleteGreat job. Even though you didn't have all the pictures you needed, you explained the process very well. It turned out very cute. I like the big stitch around the gnome. Thanks for a chance to win some fabrics.
ReplyDeleteYour table runner turned out so cute!
ReplyDeleteI like your table runner; nice use of the fabric. Thanks for sharing and for a chance to win some fabric.
ReplyDeleteSweet tablerunner - love the idea of reverse applique (I've never tried it before!!) Thanks for sharing!
ReplyDeleteGreat idea for happy Christmas table ! Thanks !
ReplyDeleteLove the runner - wonderful colors! The santa gnomas are too cute!!!
ReplyDeleteLove it and your reverse applique is great. Thanks.
ReplyDeleteI love your runner!
ReplyDeleteThis is a fabulous fabric line!
I like your reverse applique addition to the strips.
ReplyDeleteThat is adorable! I love the hand stitched detail : )
ReplyDeleteThis is so unbelievably cute, I love it! I can't wait for this line to hit our shores...
ReplyDeleteThis looks great. I <3 Gnoma Claus!
ReplyDeleteAwesome reverse applique! What a great project! Thanks for the great ideas!
ReplyDeleteThanks for sharing your runner. Sorry about your camera issues. I'm intrigued with the reverse applique. I've never tried it before but maybe I will.
ReplyDeleteJust lovely!!! The red stitching compliments the gnome really well!
ReplyDeleteIt really is beautiful, Courtney! I love the pop of red stitching! Thank you so much for playing along :-)
ReplyDeletegreat idea! like the reverse applique; it's on my list of technques to try. the red hand stitching adds a bit of pizazz!
ReplyDeleteGreat use of the fabric it showcases all the colors and prints so nicely. Great idea to highlight the gnome with embroidery. If you went through to the backing you would have an embroidered gnome as part of your quilting. I may try that. Thanks for the inspiration.
ReplyDeletelove the fabric! eatkin85@yahoo.com
ReplyDeleteI love this table runner :) Great idea with the reverse applique!
ReplyDeleteI really like the table runner. I would not have thought to do a reverse applique with the gnoma. And those colors are so me, too!
ReplyDeleteOh what a great way to show off the gnome from this fabric line. I'm totally in love with the little gnome!
ReplyDelete- sunshdws at yahoo dot com
This is such a pretty table runner. And I love how you placed the gnoma at the end. He is so cute. Thanks for sharing.
ReplyDeletequilting(dash)lady(at)comcast(dot)net
Thats just lovely! It will look perfect in the holiday season (although I reckon it looks good enough to have out all year round!!) Thank you for the little tute too, I'm not much of a sewer yet but I try hard! :)
ReplyDeleteHappy blog hopping!
Jerra xx
This is so pretty - need to learn to do reverse applique of gnomes. Thanks for the post full of fun.
ReplyDeleteWhat an adorable table topper - and the fabric is wonderful!! Thanks
ReplyDeleteawesome, thank's for the tip how to put fabric below!
ReplyDeleteI learned new technique using freezer paper today:)
ReplyDeleteandri_chama(at)yahoo(dot)com
You have TOTALLY inspired me today. I am going to spend my last day of summer break making something like this!! Thank you!!
ReplyDeleteLove the table runner and love Winterkist!
ReplyDeleteLovely! I like the red embroidery around the gnome.
ReplyDeletegorgeous table runner!
ReplyDeleteThe Gnomas really make me smile. Now winning a fat quarter bundle.. I'd be giggling for a long time coming!
ReplyDeleteThat is really adorable! Thanks for the chance to win :)
ReplyDeleteHELLO! THIS IS AN ATTRACTIVE RUNNER!
ReplyDeleteTHANKS FOR SHARING!
msstitcher1948@yahoo.com
This is a really cute table runner. It makes me wish I had a place to put one.
ReplyDeleteWonderful project!! - Love the appliqued Gnoma. Thanks for sharing!
ReplyDeleteI love it - what did you do on the other side, you said it was reversible - please show!
ReplyDeleteThe reverse appliqué is so cute!
ReplyDeleteThe reverse applique looks great! Very cute project. :)
ReplyDeleteVery cute. So cute that you should leave it out all year long.
ReplyDeleteSuper cute runner!
ReplyDeleteThanks for sharing Love the gnome.I'm so thankful for these blog hops I get to find so many new intresting informative sites.Thank-you Becky
ReplyDeletederry04@yahoo.com
I love what you did with the gnome!
ReplyDeleteGreat project. I like the hand stitching around the gnoma.
ReplyDeleteI just love this fabric and especially the little Gnome. The runner is really cute and I might attempt one. Thanks for sharing. Sandra
ReplyDeleteVery cute project. I love the fabric.
ReplyDeleteWhat a fun project! Thanks for sharing it. :D
ReplyDeleteis that terrycloth that you used as the backing?
ReplyDeleteLove the table runner! That Santa gnome is my favorite. To be honest, I didn't think I was going to like it to begin with, but now I am loving it!
ReplyDeleteThat technique is great! Thanks for the mini-tutorial!
ReplyDeleteWhat an awesome runner! Great mini tute :o)
ReplyDeleteCute, cute runner! I love those little Gnomas. :)
ReplyDeleteGreat table runner! And your Gnoma is so cute (& fierce too!). thanks for the tutorial.
ReplyDeleteGreat use of the fabrics... love the color scheme!
ReplyDeleteSuper cute and was excited to read about the 'reverse applique' as I've never seen that before! Thank you for the inspiration!!
ReplyDeleteFabulous! I really like the look of a strip runner. Thanks for the inspiration!
ReplyDeleteI love your sweet little gnoma done in the reverse applique, and the big stitch quilting!!
ReplyDeleteI love your table runner. It's so bright & cheery, and what table couldn't use a gnoma?
ReplyDeleteLove the table runner! What a great idea with the reverse appliqué for the gnome.
ReplyDeleteLove the reverse applique for the gnoma. Can't wait to get some of the Winterkist fabric!!
ReplyDeleteWonderful table runner, the colors are amazing. I like how you outline stitched the little gnoma, it really makes him pop.
ReplyDeleteI love the colors when put together that way in your runner...also, it looks great without any binding-good call!
ReplyDeleteInspiring job putting the colors together. Yours is so different from the rest--almost like a whole different line of fabric. But, then there is that little gnome guy! Great job.
ReplyDeleteNice job. Yay Winterkist!
ReplyDeleteYour runner really shows off these Christmas fabrics that I'm drooling over.
ReplyDeleteso adorable! Gnoma kills me with his cuteness and he adds just the right amount of fun to the runner
ReplyDeleteLove the colors in your table runner.
ReplyDeleteThis is such a cheerful table runner! I love the hand stitching around the little gnome - adorable!
ReplyDeleteYour table runner is adorable! I love the gnomes.
ReplyDeleteI love this fabric line! Cute table runner!
ReplyDeleteLove the reverse applique'. Thanks for the giveaway.
ReplyDeleteWhat a great use of bright Winterkist! Love the handwork around your happy knome. My sister would love this tablerunner!
ReplyDeleteLove the fabric and your table runner! Cute way to use the gnoma.
ReplyDeleteGnomes Gnomes gnomes... gotta get me some gnomes. Thanks for the chance to win. Cute table runner!
ReplyDeleteThat is so cute! I haven't done a table runner before because..well my three cats would destroy it, but the Winterkist would look great as a full size tablecloth too, and I could gnoma to my hearts content!
ReplyDeleteBright, happy cheerful tablerunner. Love the gnoma applique!
ReplyDeleteNice project, and I like the look of reversed appliqué with stitches all around.
ReplyDeleteadorable! I love the pearle cotton around it.
ReplyDeleteLove the table runner! It's so bright and happy. And the reverse applique was brilliant. I like the hand work with the embroidery thread - it was a nice touch to add to the gnoma.
ReplyDeleteThat runner is so cute! And the gnome is to die for!
ReplyDeleteThis is such a great idea. I love this fabric and can't wait to start working with it!
ReplyDeleteGreat runner! And how I love that gnome!
ReplyDeleteLove the gnomes and the table runner, thanks for sharing and for the giveaway.
ReplyDeleteI love the way you used all the colors in your runner! Thanks for the giveaway.
ReplyDeleteThis is gorgeous. I love how you made it and how the gnoma stands out. Thanks for sharing.
ReplyDeleteSo cute! Reverse appliqué is something I haven't tried yet.
ReplyDeleteDeborah
homemakerhoney @gmail .com
I love the gnomas! Great idea to reverse the applique!
ReplyDeletekelli dot sanders at comcast dot net
Winterkist is such a happy line of fabric! You did a great job on your runner, and I love the gnoma at the end! I hadn't seen how to do reverse applique before, so that was a fun detail I will have to try!
ReplyDeleteSuch a cute table runner, and something so fun even a college student could love!
ReplyDeleteYour table runner is adorable! I love the way it looks on ur table too!!!!! I may have to try to make on myself! Thanks!
ReplyDeleteCute! I'm loving seeing theses little guys pop up every so often.
ReplyDeleteLovin' your table runner! So cute...
ReplyDelete