Valentine Specimen Pillow Tutorial + Giveaway!

On to the blog hop:
We present to you the Spread the Love Blog Hop: a week's worth of tutorials and giveaways I know you'll love.

In addition to the tutorials, there are two giveaways each day from small businesses. Gotta spread some small shop love too!
Here's the line-up:
1/28:
Blog: Ellison Lane - Giveaway: Papa's Old Shirts Fabric Shop
Blog: Doodle Do Designs - Giveaway: Material Girl Quilts
1/29:
Blog: Canoe Ridge Creations - Giveaway: Knotted Threads Fabric Shop
Blog: LR Stitched - Giveaway: Lima Sews Fabric Shop
1/30:
Blog: Owen's Olivia - Giveaway: During Quiet Time
Blog: Petit Lyons - Giveaway: Stitch By Stitch Long Arm Quilting
1/31:
Blog: Jednoiglec/Sewing Under the Rainbow - Giveaway: By Mary Fabric Shop
Blog: Stitchery Dickory Dock - Giveaway: Knotty Gnome Crafts
2/1:
Blog: From the Blue Chair - Giveaway: Our Epoch Fabric Shop
Blog: Sew Crafty Jess - Giveaway: Hot Pink Stitches
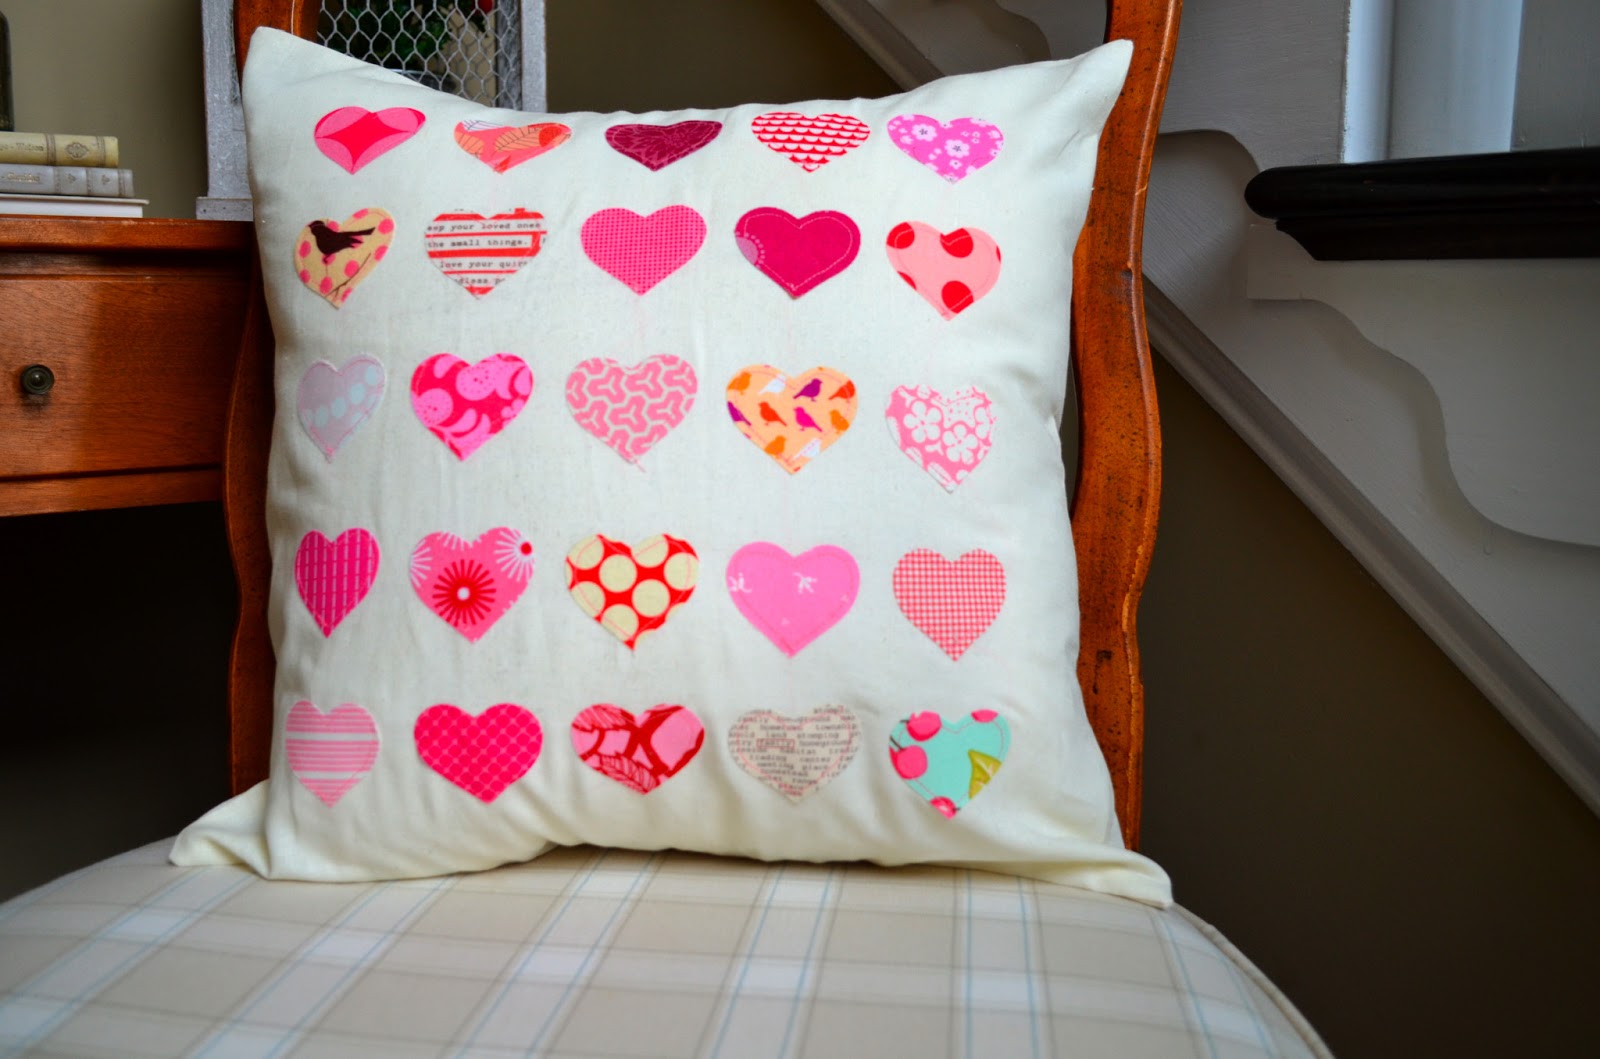
Now for the specimen heart pillow tutorial. I have always wanted to do some kind of specimen art since I first spotted the first shadowbox filled with paper punched butterflies online, and I thought this was the perfect time for it.

Here's what you need to make an 18" pillow cover:
1/2 yard of fabric (I used Essex linen in Ivory)
25 small scraps
2" heart cookie cutter, die cutter, stencil
heat'n bond or other fusible adhesive
36 x 2.5" strip of contrasting fabric (optional, leftover quilt binding is perfect)
coordinating thread
1. Begin by cutting your 1/2 yard of main fabric into one 18" square and two 18" x 12" rectangles. If your fabric is only 42" wide, you can make these panels a little smaller, even 18x10." Now mark a 12" square in the center of your 18" square by marking a line 3" from the edge on all four sides with some type of non-permanent marking device (I used the Pilot Frixon pen).

2. If you have 25 hearts about 2" in size they will fit perfectly in this square. Any way you make the hearts, you will want to find 25 fabric scraps (I did reds and pinks, but thought hard about a rainbow spectrum) and fuse your heat'n bond to the back of them. You can go ahead and peel off the paper backing.


3. There are a few ways to make your hearts. You can cut a 2" heart shape from cardstock and trace around it on each scrap, you can use a stencil or cookie cutter. I used the hearts die cutter for my Sizzix which made really quick work of this project. The picture here shows a larger scrap that got a few partial heart shapes, but I really only wanted the smallest heart on this die plate, the one at the top.

4. Once you have 25 hearts you will want to arrange them on your 12" marked grid in five rows of five. Adding a vertical line down the center and a horizontal line across the center might make it easier to line them all up, but I just played with it for a few minutes until it looked even. Once you have it how you like it press your hearts into place.

5. There are several ways you can finish your hearts. If you use no sew, heavy duty heat n' bond and you don't plan to wash this pillow cover much you could be finished. Or you could secure them a little better by sewing them with a straight line or zig zag stitch. I chose a straight line stitch. Just go slow and keep your needle about 1/8" from the edge. Once you finish you will want to press the front panel again. All that turn will make it wrinkle a bit.


6. Now we need to address the back panel of the pillow which I decided to do as a simple envelope closure. You can one 18" side of each panel by folding the fabric under 1/4" twice or you can finish the raw edge by using binding tape. Since this is a straight line, you do not need bias tape, although that will work too. I just happened to have a nice long 2.5" strip left over from a binding a strip this week that was already pressed in half. Cut two pieces 18" x 2.5."

7. You will need to press your strip in half, wrong sides together, first. Then unfold it and press the raw edges in towards the center, wrong sides together. Fold it in half again so that your raw edges are in the middle.

8. Clip or pin the binding strip around 1 18" edge of each back panel.

9. Sew in place. This is a perfect place to use a topstich foot if you have one. If not just stitch about 1.8" from the edge of the binding tape, making sure to capture all of the layers.

10. Add an extra heart to the back if you must. A great spot to embroider or stamp a little note if this pillow is a gift : )

11. Assemble your pillow for final construction by placing the front panel, right side up, on your mat. Layer your two back pieces, overlapping, with the right side down on top of the front and pin it all in place. If you did add a heart to one side, you will want to put that piece down first to make sure it isn't hidden once you make the pillow.

12. Now sew all the way around your square, a generous 1/4" from the edge. Clip your corners and turn it right side out. Use a chopstick or something blunt to poke the corners out. Press again!


All finished! If you make one I would love to see it in my flickr group, thanks!
Don't forget to leave a comment to enter the GIVEAWAY for a $40 credit toward long arm quilting services from Stitch by Stitch. What a great prize! You can check out some of Kathy's amazing work here. This giveaway will stay open until February 5.
Thanks for stopping by today, make sure to check in with the blog hop for the remainder of the week to see the great tutorials and enter the giveaways!


great tutorial, I really love it. thank you. hugs Alessandra
ReplyDeleteI love this tutorial!! Too cute!!! :) And thanks for the chance to win! :)
ReplyDeleteLove all the hearts!
ReplyDeleteWhat a cute pillow!
ReplyDeleteThat is an adorable pillow. Thanks for the tutorial. Kathy's so talented; it would be wonderful to win her giveaway!
ReplyDeleteoooh! perfect pillow to go with my xoxo pillow!
ReplyDeleteThank you for such a great tutorial! I've found some awesome new blogs on this Love Blog Hop.
ReplyDeleteNo need to enter me in the give a way. I am trying hard to do my own quilting at this point.
ReplyDeleteYour pillow is so adorable. Thanks for the tutorial.
Good luck on baby #3. How fun.
what a fun pillow!
ReplyDeleteI like that pillow so cute!
ReplyDeleteAbsolutely beautiful pillow and awesome tutorial! Thank you for posting this - bookmarking!
ReplyDeleteGreat tutorial and pillow, thanks for the chance to win!
ReplyDeleteFun pillow, thank you for participating! I just found your blog through this hop - it looks like fun!
ReplyDeleteI am making this pillow! It is jsut tooo cute!
ReplyDeleteThanks for the tutorial! This pillow is really precious!
ReplyDeleteAnd thanks for the chance to win!
Love it, the little hearts are so cute, do you like your Sizzix?
ReplyDeleteAdorable pillow - thanks for showing us how! Great giveaway too.
ReplyDeleteWhat a cute pillow!!
ReplyDeleteSo adorable. Thanks!
ReplyDeleteI love the background fabric. Thanks for the idea!!
ReplyDeleteLove your Pillow!! Thanks for the Tutorial!! :)
ReplyDeleteThanks too, for chance to win your Drawing!! ;)
Thanks for the tutorial! I also love your heart embroidery pouch. :) Thanks for the chance to win!
ReplyDeleteGreat tutorial and pillow! Thanks :)
ReplyDeleteSuch a lovely pillow - love the die cut machines! Good luck to everyone on the giveaway!
ReplyDeleteI love this pillow! I am definitely going to have to try it out.
ReplyDeletegreat pillow and wonderful giveaway
ReplyDeleteLove the pillow. It reminds me of conversation hearts. Thanks for the giveaway!
ReplyDeleteGreat tutorial! Thanks for the giveaway!
ReplyDeleteThank you so much for the great pillow tutorial. I want to go home and lock myself in my sewing room right now. Maybe later. Thanks for the chance to win the giveaway.
ReplyDeleteWhat a cute pillow! Thank you for the tutorial. Thank you for sharing & for the chance at such a great giveaway.
ReplyDeleteWhat a fun pillow! I'm going to add it to the list for my daughter's birthday!
ReplyDeleteSuch an adorable pillow! Thank you.
ReplyDeleteCute pillow and the hearts are so symmetrical! Would love to find a new long arm quilter. Also plan to check out your past posts for Valentines Day.
ReplyDeleteGood luck with baby #3!
This is such a cute pillow! Great tutorial and thx for the giveaway!
ReplyDeleteCute, very cute! Great tutorial and love the photos along the way. Thanks for sharing with us, super job!
ReplyDeleteThank you and Stitch ny Stitch for an awesome giveaway and a chance to win. Peeked at Kathy's quilting, gorgeous!
usairdoll(at)gmail(dot)com
Love the pillow!
ReplyDeleteAparrish1113@yahoo.com
Pretty pillow. What a great prize.
ReplyDeleteCute pillow! Those little hearts are precious!
ReplyDeleteYour hearts are perfect - lovely.
ReplyDeletesuper cute pillow!!!!! thanks for the chance
ReplyDeleteLovely hearts!!
ReplyDeleteI love the pillow and now I am convinced I have to buy those clips.
ReplyDeleteHow adorable! You make it look so easy :)
ReplyDeleteWhat a great project! And I have a quilt that I would love to send out to have quilted, thanks for the chance!
ReplyDeleteourbusylittlebunch(at)hotmail(dot)com
Beautiful pillows, love the colors! Many thanks for the great giveaway!
ReplyDeletemyself1977(at)gmail(dot)com
Adorable Amore Pillow!
ReplyDeleteDeborah
pinkscissorsdesign @gmail .com
Gorgeous pillow.Thanks you!!
ReplyDeleteThanks for the great tutorial. I could see making that pillow with other shapes (stars, circles, leaves) for other times of the year. Thanks for the inspiration!
ReplyDeleteellen(at)myerly(dot)net
Love the pillow! Thank you!
ReplyDeleteI love this pillowcase.
ReplyDeleteSo modern and bright
Just adorable...I will be making one!
ReplyDeleteThe pillow is so CUTE!! LOVE it. And I would LOVE to win the long arm quilting too!!
ReplyDeleteThe pillow is to cute and the giveaway is AWESOME!
ReplyDeletelisamcgriff (at) hotmail (dot) com
I so enjoyed the pillow tutorial, well done! I would love to enter the giveaway but as I live in Australia, please redraw and someone else can then be as lucky as me!Thanks.
ReplyDeleteLove the pillow! I am putting it on my to do list!
ReplyDeleteWhat a sweet pillow! Happy valentine's Day.
ReplyDeleteNice pillow! There is jjst something I love about machine applique! Thanks for the giveaway
ReplyDeleteLove your cushion cover! You have the greatest selection of fabric for this project.
ReplyDeleteWhat a great pillow and fabric choices! I learned about the cutting machine this past weekend at a quilt show (I am new to sewing) and I am drooling. Thanks for the giveaway!
ReplyDeleteThank you for your posts and inspiration!
ReplyDeleteLove the pillow and could really use this giveaway.
ReplyDeleteMaryD
www.stitchesonmyneedle.blogspot.com
This is so cute!!! I love all the teeny hearts! :D
ReplyDeleteDarling pillow; thanks for the tute!
ReplyDeleteCute Pillow, thank you for the tutorial. :)
ReplyDeleteThanks for the tutorial!
ReplyDeleteThanks for the tutorial and the chance to win.
ReplyDeleteThis is so cute! :)
ReplyDeleteHoping that everything I need to finish gets done...I want to make one of these pillows! So Cute!!! Thanks for sharing the great tutorial!!!!
ReplyDeleteGreat project! Thank you for sharing .
ReplyDeleteI love your pillow tutorial! Thank you.
ReplyDeleteSuch a cute take on specimen art - love this! It's like the paper-punched paint chip cards you see this time of year, only in fabric form!
ReplyDeleteSuch a cute pillow! Thanks for the tute and chance to win!
ReplyDeleteWhat an adorable pillow! And congrats on the little one on the way!
ReplyDeleteLove the heart pillow ~ I've just got to get a fabric cutter to do things like hearts and 2 1/2" blocks. Thanks so much for the tutorial!
ReplyDeleteLove the pillow... and a great tutorial for finishing the back! I also love the heart embroidery pouch.
ReplyDeleteI just discoverred your blog today. What a treat. That little heart pillow tutorial is amazeing .. and a giveaway too..I will be anew follower as of today.
ReplyDeleteconn_and_vans_mom(at)yahoo(dot)com
Very cute! I bet the die cutter made quick work of the hearts!
ReplyDeleteSo Cute!!!
ReplyDeleteWhat a sweet pillow - thank you for the tutorial!
ReplyDeleteVery cute pillow.
ReplyDeleteHearts are my favorites. Love the pillow.
ReplyDeleteThank you for the tutorial.
ReplyDeleteThanks for the great tutorial. I love the way you included a little heart on the back of the pillow.
ReplyDeleteReally fun project tutorial. Your giveaway is really unique. I'd have to finish a quilt to take advantage of it.
ReplyDeletereally cute pillow! thanks for the tutorial and the giveaway!
ReplyDeleteLove this idea!
ReplyDeleteCool pillow!
ReplyDeleteThis gives me such ideas! Thx for the chance.
ReplyDeleteAbsolutely adore this! Thank you for the great instructions and a chance to win. :) Have a blessed weekend!
ReplyDeleteThis is cute. I am so gonna make it. Will bookmark it for sure.
ReplyDeleteI like your tutorial. Pretty easy to do. I think I could do it in a day - hopefully. I already have a pillow and all the fabric! Thanks for the chance to win! I use Long Armers only. I don't quilt my own quilts. Jeanne
ReplyDeleteI just discovered you website today! Thanks for the tutorial and the giveaway!! My email address is jenjeb@juno.com
ReplyDeleteHearts are my favorite motif - I collect everything hearts. This pillow is so cool! Love your fabric choices! And the header on your blog is great.
ReplyDeleteWhat a cute pillow! Thanks for the tutorial and a chance to win!
ReplyDeleteI love this pattern. I'm going to have to make this for sure!
ReplyDeleteThat is super cute! My red loving, cuddle-bug boy would love this !
ReplyDeleteI love this pillow! Thanks for the chance to win!
ReplyDeleteLove the pillow! Thanks! And thanks for the giveaway!
ReplyDeleteLooooove your pillow! Hearts are soooo pretty...grrrrreat fabrics used! Goooood job! :)
ReplyDelete